SOFT4Library User Guide
- 16 Oct 2024
- 27 Minutes to read
- Contributors

- Print
- DarkLight
- PDF
SOFT4Library User Guide
- Updated on 16 Oct 2024
- 27 Minutes to read
- Contributors
- Print
- DarkLight
- PDF
Article summary
Did you find this summary helpful?
Thank you for your feedback
1. Purpose of the SOFT4 Library App
The purpose of the app is to have all common functionalities between SOFT4 apps in one place. SOFT4Leasing, SOFT4Factoring, SOFT4Wholesale apps are now separated and function on their own depending on the SOFT4 Library App, but they can also be joined together and share common fields.
Functional areas which have been moved to Library App are Documents, E-Signature, Activity Log, Collections, Extended Contact data including phones and emails, Currency, Email Notifications, Asset Hierarchy, Status Flow, Invoice Type etc.
2. SOFT4 Setup
SOFT4 Setup has some common setup which can be used for apps which has a dependency from Library app.

Default Contract Type defines which contract type is default in the system and it will be automatically suggested when user validates Contract No. field on sales, purchase document or on the journals. Each depending on app must implement Default Contract Type suggestion logic in their apps.
If Hide Contract Type On Pages is enabled, then field Contract Type will not be visible in the system. For using this option Default Contract Type cannot be blank.
Days for License Expiration Notification defines when system users will start seeing notification that license is close to expiration and must be renewed.
Notification Engine defines which notification engine is used in the system. Available options are Email and Advanced. Once advanced is enabled it is not possible to revert.
TAX Caption Affix defines which affix will be shown for tax fields across the system. Available options are VAT, GST and TAX.
Documents Storage Location defines where document attachments are stored. Currently there are two options Local Database and Azure Storage.
3. Contact functional area
Contact Card Fast Tabs: General, Communication, Payment, Contact Persons, Activity, Roles and Documents.
General Fast Tab contains following fields: Individual/Business, Legal Form, Legal Form Description, if the contact is Individual, then individual related fields become visible on contact card like Salutation, First Name, Middle Name, Surname, Birth Date etc. If the contact is Business, then business related fields become visible, like Trading Name and additional group for Business Profile which contains fields Date Established, Registration No., Industry Group, Industry Group Description, Years Trading, Total Sale/Gross Rev. Amt, Total Sale/Gross Rev. Yr., Net Profit Last Year No of Employees, Nature of Business. Group Monitoring consists of fields Monitoring Flags, Flag Date and Flag Note.
Communication tab has Privacy Consent, Privacy Consent Expiration Date, Marketing Consent , Marketing Consent Expiration Date fields and if it is Business contact, it has Contact Person fields.
Payment Fast Tab has 3 fields: Application Method Cust., Application Method Vend. and Skip Email Notification Creation fields.
Activity Fast Tab has two groups. Group Balances as Customer has following fields Balance (LCY), Balance Due (LCY), Oldest Due Date, Overdue Amount, Overdue Days, Last Payment Amount. Group Balances as Vendor has following fields Balance (LCY), Balance Due (LCY).
Roles Fast Tab contains contact roles: Customer, Originator, Supplier, Insurer and Distributor.
Fact boxes have File Drop Area, Documents Bin and Document Preview for easier document management.


Every business contact should have a Legal Form field filled, to create Legal Forms, navigate to Search menu and type Legal Forms.
Fill in the following fields:
Code – Short code for legal form.
Description – brief description of the legal form.
Type – Possible options are Company, Partnership, Sole Trader/Self Employed, Other.
Active – Sets legal form as active.

If Contact is Originator, Originator Details fast tab becomes visible, and Originator Group Code can be assigned to it.

To create an Originator Group, navigate to the Search menu and type Originator Group List in the search bar:

Some countries also have counties. To setup counties, navigate to the Search menu and type Counties in the search bar:

To create a county, enter a Code and Name, then in the Country Code field select a country from the list to which county belongs to.
Common actions were moved to the Library App too. In the Contact Card user can find “Email Notifications” action in History group, in the Contact group user can find “Bank Accounts”, “Phone Numbers”, “Emails”, “Collection Action Log”, “Interaction Log Entries”, “Customer Ledger Entries” and “Vendor Ledger Entries”, all these actions will navigate to pages with information for selected contact.

Contact List fact boxes have File Drop Area ,Documents Bin and Document Preview areas.

A list of all Emails and Phones for the contacts can also be found in different pages, i.e., user can look for “Emails” in the search bar to find a list page of all emails attached to contacts. The same can be done for phone numbers.


4. Registration No. Validation
Registration number validation allows user to set up allowed formats for every Country/Region. To find this setup, navigate to Registration No. Setup page. If Country/Region has a format setup in Registration No. Validation Setup, system will check it every time user tries to change „Registration No.“ for contact. There are 3 possible Registration No. validation rule options in the setup:
• No validation – system will not validate „Registration No.“ for contacts.
• Error – system will check if Registration No. Validation Setup has any formats set up for contacts’ „Country/Region“ and if new „Registration No.“ value does not match any of them, it will throw an error and revert the change.
• Warning - system will check if Registration No. Validation Setup has any formats set up for contacts’ „Country/Region“ and if new „Registration No.“ value does not match any of them, it will show warning to the user.

Registration No. Formats fields:
Country/Region Code – select country, for which you want to set up Registration No. format.
Format – set format for selected country. You can input special symbols: @ - digit, # - A-Z characters, ? - any character.
5. Email Notifications
Email Notifications functionality allows to create and distribute various types of email notifications. This includes:
• Configuring email notifications
• Creating Email Notification templates
• Running and configuring job queues for email notifications creation and distribution
• Checking the history of email notifications.
5.1 Email Notification Setup
Email notification setup allows to configure notifications for some pre-defined events. Currently, Library App allows to configure notifications for Sales Invoice creation and Sales Credit Memo creation. Additional events should be extended by another app. User must create and configure Email Notification templates to be able to send and distribute Email Notifications. Also, general setup must be completed for email notifications.

- Active indicates that email notifications are enabled. When field Active is disabled, the system will not create and distribute any of the notifications.
- Email Account (from) allows to choose the email account from which email notifications will be sent by default.
- Maximum No. of Attempts to Send field sets the maximum number of attempts to send email notifications if for any reason those emails couldn’t reach their recipient.
- Emailing Test Mode activates testing mode, which is used to send notifications as a test.
- Test Mode Email field is used to choose email to which test email notifications will be sent to.
5.2 On Sales Invoice / On Sales Cr. Memo Setup
Use this setup if you need to send Sales Invoice or Sales Cr. Memo documents to your customers by email.
- Individual/Business can be used to configure personalized notifications separately for individual and business customers. Select All if you do not want to differentiate notifications by these criteria.
- Select Customer Notification Template Code for email notification.
- Select Email Account (From) if you do not want to use standard email account for email notifications and there is a requirement to have different outgoing email address (e.g., customerservice@company.com)

5.2 Email Notification Templates
To send Email Notifications, a user must create and set up Email Notification Templates first by defining at least email subject and selecting body template.

- Input Code field value to uniquely identify the new template.
- Provide a comprehensive description in the field Description.
- Subject Text field allows to define email subject. You can use placeholders for dynamic parts in the subject. Currently the following placeholders are available: %1 – Customer Name.
- Body Template field allows to choose Word template which will be used as email body template. Refer to Document Management guide for details on how to create a new Document Template. Note - Output Doc Format must be Save as HTML for the Document Template if you want to use it as a Body Template.
- Body Template Description shows selected document description.
- Checkmark Sales Invoice / Cr. Memo as Attachment field to attach sales invoice / credit memo copy for notification.
- Select template in field Attachment Template for the email attachment if you want to attach some other document to notification.
- Attachment Format field allows to choose the format of the notification attachment.
- Checkmark Save To Document allows to save email attachment to document.
5.3 History of Email Notifications
Navigate to Email Notifications page to review all created and not yet sent notifications. Also, you can find notifications with errors here.

Navigate to Email Notifications Archive page to review all Sent and Undelivered email notifications.

You can also review all related notifications on the:
Contact Card:

Posted Sales Invoices:

6. Notifications
Notifications functionality allows to create and distribute various types of notifications:
• Email
• SMS
This includes:
- Configuring notifications
- Creating Notification schemas
- Assigning specific Notification schemas for contacts
- Creating Email Notification templates (described on 5.2 Email Notification Templates )
- Creating SMS Notification templates
- Running and configuring job queues for notifications creation and distribution
- Checking the history of notifications.
6.1 Notification Setup
Library App allows to configure notifications for Sales Invoice creation and Sales Credit Memo creation. Additional events should be extended by another app. User must create and configure Email Notification templates to be able to send and distribute Email Notifications. Also, general setup must be completed for notifications.

- Active indicates if notifications are enabled. When field Active is disabled, the system will not create and distribute any of the notifications.
- Email Account (from) allows to choose the email account from which email notifications will be sent by default.
- Maximum No. of Attempts to Send field sets the maximum number of attempts to send notifications if for any reason those emails or SMS couldn’t reach their recipient.
- Test Mode indicates if testing mode is enabled.
- Test Mode Email field is used to choose email to which test email notifications will be sent to.
- Test Mode Phone No. field is used to choose Phone No. to which test SMS notifications will be sent to.
6.2 On Sales Invoice or Credit Memo Setup
Use this setup if you need to send Sales Invoice or Sales Cr. Memo documents by email or other notifications to your customers.
- Document Type defines for Sales Invoice or Sales Cr. Memo documents this setup is valid.
- Invoice Type Filter allows define filter of document type.
- Individual/Business can be used to configure personalized notifications separately for individual and business customers. Leave blank if you do not want to differentiate notifications by these criteria.
- Legal Form can be used to configure personalised notification for every legal form of customers. Leave blank if you do not want to differentiate notifications by these criteria.
- Legal Form Description is filled in automatically according to selected Legal Form.
- Default Notification Schema Code defines what kind of notifications should be sent.

6.3 Notification Trigger Recipients Setup
Use action Recipients Setup to open this setup.

- Recipient Type defines who will be primary recipient.
- Secondary Recipient valid only for email notifications and defines CC recipient.
- **BCC Recipient **valid only for email notifications and defines BCC recipient.
- Select Email Template Code for email notification.
- Select Email Account From if you do not want to use standard email account for email notifications and there is a requirement to have different outgoing email address (e.g., customerservice@company.com)
- Select SMS Template Code for SMS notification.


6.3 Notification Schemas
Notification schemas allows to configure notifications creation order.

Notifications can be send using different methods in parallel (if they have same Priority) or use lower priority method if details for higher priority method are not available (e.g., first try to send by e-mail, but in case e-mail address is not available try to send SMS which has lower priority).

6.4 Contact Notification Schemas
Contact can have Notification Schemas which has priority over default Notification Schemas.


6.5 SMS Templates
To send SMS Notifications, a user must create and set up SMS Templates first by defining SMS body templates.

- Input Code field value to identify uniquely the new template.
- Provide comprehensive description in the field Description.
- Message Template field allows to define SMS text. You can use placeholders for dynamic parts in the subject. Currently the following placeholders are available:
- %1 – Customer Name
- %2 – Contract No.
- %3 – Invoice or Credit Memo No.
6.6 History of Notifications
Navigate to Notifications Entries (SOFT4) page to review all created and not yet sent notifications. Also, you can find notifications with errors here.

Navigate to Notifications Archive (SOFT4) page to review all Sent and Undelivered notifications.

You can also review all related notifications on the:
Contact Card:

Posted Sales Invoices:

Posted Sales Credit Memos:

7. Multicurrency
Multicurrency module allows to finance and operate agreements in foreign currency. Financing Currencies (Navigate to Search window and type Financing Currencies) lists currencies available for asset finance.

Currency action allows the user to create foreign currency and Exch. Rates action allows user to set up exchange rates for different dates.
For SOFT4Leasing, to finance an asset in a foreign currency the following parameters of a contract must match:
- Contract Currency
- Currency of a Financial Product
- Currency of a Program
All amounts shown on the application card and contract card are in a contract currency. Contract currency exchange rate is selected according to the activation date. It is allowed to adjust the rate at the compliance stage. Contract currency exchange rate has no effect when financial product with Currency Exchange Rate Type = Currency Exchange Rate is used for the financing.

Contract currency code (CCY Code) and amount in contract currency (Amount CCY) can be found in general ledger entries.
8. Activity log
Activity log can be found by navigating to Search bar and typing „Activity Log“. This page has information about events that happened and is commonly used together with Job Queue Entries, so the user can check if the Job Queue jobs had any errors while running in the background or see the results, if the job was successful.

Activity log fields:
Severity – indicates how severe activity log entry is. Possible values: Info, Warning and Critical. If severity is Critical, entry text will be Bold.
Description – gives information about the entry process. Gives error message if severity is critical.
Record Position – gives link to the record for which the entry was created, i.e., Contract No. If job was not for a specific record, for example - invoicing run for multiple invoices, field will be empty.
User ID – indicates user who performed certain task.
DateTime – show exact time when the entry was created.
Object Type, Object Id and Object Name – shows information about the object for which the entry was created.
Activities log for related records can be found in the action list for the record, for example, in the application card in SOFT4Leasing. It will only show activity log entries for specific record.

9. Collections
In collection worksheet an officer sees contacts who have debts. Collection officer tracks overdue amounts, overdue days and takes actions to make a contact with customer, summarizes actions in the systems, records next steps that should be done.
9.1 Collection Worksheet

Contact Card opens a card of a selected contact.
Assign Collection Officer action assigns collection to a selected collection officer.
Collection Action General – opens collection action card and allows officer to create a collection action for selected contact.
Show My Collections filters collections worksheet according to a user ID. Only collections that a user is responsible for are left.
E-Mail Notifications opens list page for the email notifications that are created for the selected contact.
Customer Ledger Entries – opens customer ledger entries for selected contact.
Collection Action Log action brings to Collection Action List, where all actions that have been made within contacts are listed. For easier access to information, Open Customer Ledger Entries have been added to the fact box area, so the officer can easily see which ledger entries are not closed.
9.2 Collection Action Card
Collection action cards are used to log collection action to the system.
Collection action card fields:
- Officer Code. Code of an officer, who is taking the collection action.
- Action Template Code. Template code of an action. The available action options are first call or collections call. Select one of given options or create new action template code.
- Interaction Type. Type of an actions with a contact. The available types of actions are: call, email, letter and other.
- Follow-up Date. Date which alerts that it is time to check a contact again.
- Promise to Pay Date. Choose a date at which a contact makes a promise to pay.
- Promise to Pay Amount. Amount that a contact made a promise to pay.
- Attempt Failed. Check box if a collection officer is not able to reach the contact.
- Contact No. Contact number.
- Contact Name. Name of a contact.
- Phone No. Phone number of a contact.
- Asset Description. Description of financed assets.
- Date. Date when collection officer interacts with a contact.
- Time. Time when collection officer interacts with a contact.
- Description. Free text box. Summarize the talk with a contact.
- History. Summarizes which user and when created collection action.

10. Document Management
Document management functionality enables users to easily manage documents.
This includes:
- Modifying document templates
- Setting up frequently used documents sets
- Importing and attaching documents to the system
- Printing documents
- Reviewing documents
10.1 Document Templates
Document template functionality allows user to set up different document templates and configure additional settings for different templates. Setup page can be found by typing „Document Templates“ in search window.
Adding new template:
- Click New and fill Code field with unique document name
- Fill in Description field
- In Default Document Send-to field choose who should be receiving this document. Possible values are: Customer, Originator, Third Party.
- Check Instant E-Mail if you need to send it as soon as it’s created.
- In Remarks field enter any additional information if needed.
- Choose language code in Language Code field to define language of the document.
- Select Output Document Type. Possible values: Excel, Word, Html, Pdf. Choose Pdf if document should not be editable by the recipient.
- Select report layout in Custom Report Layout ID field.
Editing existing template:
- Select document template you want to update and use Update Layout action to update document with newest dataset structure.
- Export report by using Export Word Layout action.
- Modify report as needed using Word.
- Select the same report and use Import Word Layout action to update the report.

10.2 Document Sets
Document sets are used to help manage documentation. A document set contains a list of document templates that are required for a particular part of process in the app. Document set predefines the necessary documents for process activity. The document from a set can be moved to a contract documents list faster than one by one. Document Set window specifies the document sets that are described within the system. The user can set validation period, language, description for a document set. The user can also navigate to the document set lines.

Code. Identifier of a document set.
Description. Description of a document set.
Valid From/Until. The date when the document set entered into effect or was canceled. System automatically filters non-valid ones at the moment of insertion.
Language Code. Document set language identifier.
Set Lines. The number of documents that are included in a document set.
10.3 Document Set Lines
New Document set lines can be added in “Document Set Lines” page. These set lines will be added to selected document set.

- Template Code. Select Document Template for Document Set Line
- Description. Description of a document set line.
- Valid From/Until. The date when the document set line entered into effect or was canceled. System automatically filters non-valid ones at the moment of insertion.
10.4 Documents List
“Documents” page Contains a list of documents that are stored as attachments in the system. Appears in the system as a Fast Tab in some pages.

To import the document, you must set Document Type and Document Date in the Documents fast tab and import the file using Import action. Every printed document is attached to the system automatically.

A document is removed only when the user deletes the corresponding attachment.
Only Prepared documents can be Signed. And only Signed documents can be Checked. Documents from a predefined document set are moved to a document list by choosing Get standard document set.
10.5 File Drop Area
You can import and attach various files to the system by simply dragging the file to the file drop area. Several documents can be uploaded within one drag & drop action. File Drop Area is available in list pages and card pages. Uploaded documents will also be visible in the Documents Fast Tab. Documents Bin shows all documents related to the record and the date when it was uploaded together with description. Users can click on document date to simply download the document.

10.6 Document Viewer
Document Viewer allows users to see document content without downloading it to local computer. Each documents fact box has Document Preview area where user can see document content before opening it.

Click action View Document to see document content directly in the system:

11. E-Signature module
E-signature module purpose is to allow electronic signing of the contracts. The module can use OneSpan or DocuSign service to support digital document signing. E-Signature module together with provider service includes:
- Signature placeholders’ definition in document templates (takes part in module S4L.DM).
- Creating and sending document packages to applicants for signing.
- Tracking statuses of packages and signers.
- Attaching signed documents to contract documents (takes part in module Document Management).
- Linking signing process flow to trigger automatic application status updates.
11.1 E-Signature anchors
Signature placeholders (i.e., anchors) must be defined for the document template. Any anchor is defined as a text string and cannot have space characters in the definition:

The same anchors must be found in the document template:


An account with API key in the OneSpan or DocuSign service self-service portal must be created to enable E-signature module.
General
- E-Signature Provider. Select E-signature provider, either DocuSign or OneSpan.
- Packages No. Series. Select number series for E-signature packages.
- Set All Individual Applicants as Signers. Every individual, sole trader and partnership applicant is automatically flagged as "E-Signature Signer".
- Send Package Automatically. If “Create & Include to E-Signature Package” is flagged in “Document Selection” to print documents, the E-Signature Package will be sent automatically.
Status Filter
- Status for Signed eSignature. Status of a package in which all documents were signed. The status must be valid at OneSpan and DocuSign services.
- Status for Pending eSignature. Status of a package sent to the signers. The status must be valid at OneSpan and DocuSign services.
- Status for Declined eSignature. Status of a package rejected by the signers. The status must be valid at OneSpan and DocuSign services.
OneSpan
- OneSpan API URL. URL of OneSpan service API.
- OneSpan API Key. Key that was generated by OneSpan to connect to the service.
- Default Email Text: enter text string which will be automatically added to every email e-signature email.
- File Extension Filter for Allowed Documents in EsignLive: a filter for file extensions, that are supported by OneSpan.
- Email. Email address to send OneSpan e-signature emails from.
- First Name. First name to send OneSpan e-signature emails from.
- Last Name. Last name to send OneSpan e-signature emails from.
DocuSign
- API URL. URL of DocuSign service API.
- User Name. DocuSign service user name.
- Password. DocuSign service password. (If app is registered after 2021 August, you need to use DocuSign generated password instead of your account password, see the guide here: App Password authentication (docusign.com) )
- Integration Key. DocuSign service integration key.
- Account ID. DocuSign service account ID.
- Download Certificate. Toggle switch on to download certificate.
- Email Subject. Subject of DocuSign e-signature email.
- Email Text. Text of DocuSign e-signature email.
11.2 E-Signature packages
E-signature package card contains general information about the package and documents related to the package.

General
- Package No. Package number, assigned automatically at the time the package is created.
- ID. Package ID number, assigned automatically by E-signature service at the time the package is moved to the service.
- Status. Status of the package. The status is updated (manually or automatically) from E-signature service after the package was moved to the service. The available statuses are SENT, DECLINED, COMPLETED, OPTED_OUT, EXPIRED, ARCHIVED.
- Documents Downloaded. The flag is marked automatically when documents are downloaded from E-signature service. The documents are downloaded when packages get status which follows the filter in the E-signature Setup “Status for Signed eSignature”. When a package is marked “Documents Downloaded” it is excluded for pending to be downloaded.
Documents
- Type Code. Property of a document entity (refer to S4L.DM documentation)
- Template Code. Property of a document entity (refer to S4L.DM documentation).
- Signers show a total number of signers in the document. You can drill down to review or update signer’s details (e.g., email, phone number) before sending the package.
- Type. Document status in the package:
Initial – the initial document that was sent for signature (i.e. document without signatures);
Signed – document that was downloaded from E-signature service. - Description. It is a description of a document.
11.3 Signers
The package is distributed to the responsible persons, called E-Signature Signers in the system. Each anchor in the documents must be assigned to a signer.

- Anchor. text string which indicates where the signer must put its signature.
- No. signer number which is the number of the customer in the system.
- Role. defines role in the contract.
- First Name is the first name of the signer. First name is indicated on the document together with the anchor.
- Last Name is the last name of the signer. Last name is indicated on the document together with anchor.
- Email that should be used to send document for signing to the signer.
- Order No.: define signing orders of different signers in the ascending order.
- Custom ID: signer ID in the e-signature service. Is automatically generated from Package No. and Applicant No.
- Status: Status of the signer. The status is updated (manually or automatically) from e-signature service after the package was moved to the service. The available statuses are SIGNING_PENDING, COMPLETED, CANCELED, INACTIVE, DECLINED, EXPIRED, OPTED_OUT, ARCHIVED
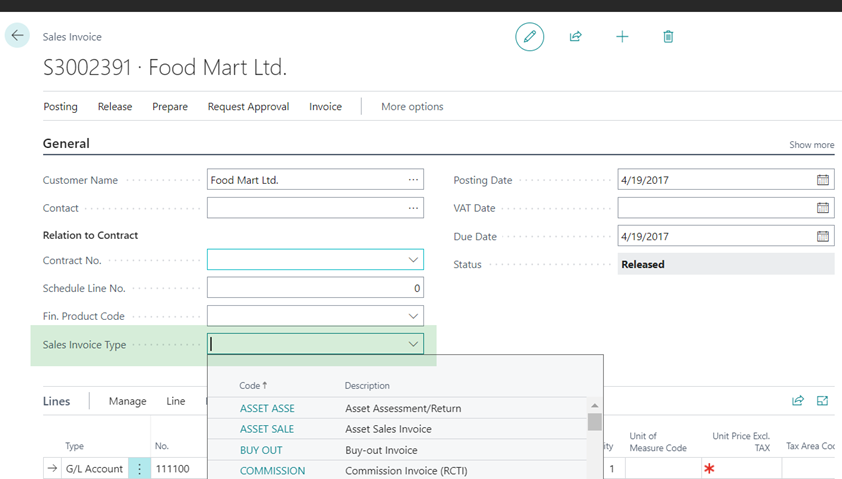
12. Invoice Type Setup
Invoice Type Setup allows users configure multiple invoice types and assign them on Sales Invoice or on Sales Credit Memos.

- Code – defines Invoice Type Code
- Description – defines Invoice Type Description.
- Payment Terms – defines payment terms of the document.
- Invoice Report ID - specifies the value of the Report ID to be used to create document.
- Draft Invoice Report ID - specifies the value of the Report ID to be used to create document.
- Credit Memo Report ID - specifies the value of the Report ID to be used to create document.
- Draft Credit Memo Report ID - specifies the value of the Report ID to be used to create document.

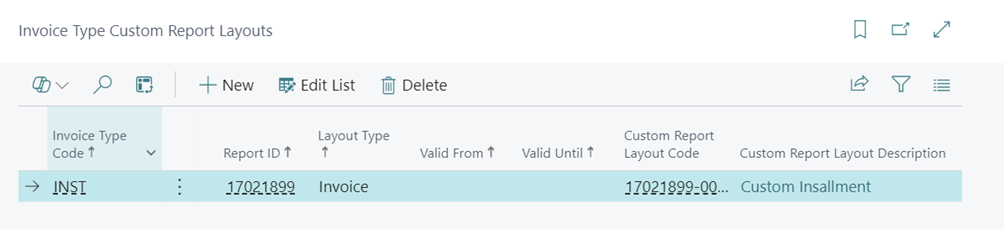
13. Custom report layouts by Invoice Type
Allows to configure different invoice layouts by invoice type.
- Invoice Type Code defince invoice type code.
- Report ID defines data set id.
- Document Type defines invoice document type. Available options are Invoice, Draft Invoice, Credit Memo, Draft Credit Memo.
- Valid From defines from which date layout is applicable.
- Valid Until defines until when layout is is valid.
- Custom Report Layout Code defines custom report layout code.
- Custom Report Layout Description defines custom report layout description.

14. Asset Hierarchy
Assets hierarchy objects were moved to Library app, so other apps do not have to duplicate them: Asset brands, Asset categories, Asset groups, Asset models, Asset types. Required assets information can be setup in Library App.


15. Status Flow
Statuses represents a framework to add configurable status fields to any table easily. By using this framework developer gets the following benefits:
- Automatic Status change tracking
- Ability to define status flow rules
- Ability to violate status flow rules by assigning special permissions to users.
15.1 Status Setup
Status setup must be modified when:
- New Status field together with corresponding trigger field has been added to a new table. Usually this is done by developer, not system user.
- Existing Status list must be amended. Refer to existing records to understand general setup idea.
- Status Workflow is changed
Status Trigger Captions setup must be amended in case new Status field must be included in Status setup.

Target Table ID. Input or select from list table’s containing Status field number.
Trigger Field No. Some field in the target table plays Status role. This field always has companion field which is Option type field called Trigger. Input or select from the list this field number.
Language Code. If you use multi language feature, please create record for every language in the system.
Trigger Option No. Select one of the available options for Trigger field.
Description. The value is suggested automatically but can be amended depending on language code.

Code and Description. The fields are used to uniquely define status. The Code is used widely in the system and must have short and clear value for this reason. The Code is unique for all tables containing statuses and must be created having this in mind.
Target Table ID. Input or select from list table’s containing Status field number.
Target Table Name. Showing name of selected target table.
Trigger Field No. Some field in the target table plays Status role. This field always has companion field which is Option type field called Trigger. Input or select from the list this field number.
Trigger Field Name. Showing name of selected target field.
Trigger Option No. Select one of the available options for Trigger field. Status Trigger Name Caption setup must be completed first if you create setup for a totally new Status field.
Trigger Option Name. Showing name of selected trigger option.
Status Field No. Some field in the target table plays Status role. Input or select from the list this field number.
Status Field Name. Showing name of selected status field.
Message. Input free text which appears as automatic Message to a Customer if Status is changed for Schedule table.

Once the list of statuses for a particular field is completed the status flow setup must be created or amended. System will not allow to make transitions from one Status to another if Status flow setup is not defined.
Select Status record in the list and then select action Status Flow Setup. New page pops up where you can define what are the statuses from which current status can be changed to. Also select statuses to which current status can flow.

If Status Flow is not defined the system does not allow the transition between two statuses unless user is flagged as Status Admin in User Setup table.
15.2 Status Usage
Whenever Status is changed system fills Status History log. Users can build audit or SLA reports based on data in this table.

16. Non-Working Days
Non-Working days list contains national or bank holiday dates for the company.

17. Administrator Role Center
A new Role Center called ‘S4LIB Administrator’ has been created to provide administrators with easy access to all the necessary information in one place. From this Role Center, users can access a variety of features, including All Contacts, Users, User Personalization, User Setup, Profiles, Job Queues, Change Log Setup, E-Mail Notifications, Recent Warnings, and Email Activities.

18. Azure Storage Account Setup
Azure Storage Account Setup is used to save document attachements to Azuore Blob Storage. For that Document Storage Location must be set to Azure Storage in SOFT4 Setup table.
Field Acount Name is the name of Azure Blob Storage account, field Shared Access Key is a key for accessing Azure Blob Storage account.
Action Test Connection to Azure is used to check if Azure Storage account is accesable from environment where business central is hosted.

19. Monitoring Flags
Monitoring Flags are used to track of the detailed status of delinquent, non-performing contacts. Configurable flags and sub flags. The officer can flag contacts and see the monitoring history. Example of flags: on alert, at risk, customer skip, to be repossessed, legal action.


Was this article helpful?